Vagrant入門~仮想Webサーバ構築~
Vagrant
Vagrantは開発環境の構築,管理,配布などが出来る開発環境作成ツールです.開発する際のhttpdのインストール,phpのインストールなど様々な処理をシェルスクリプトで記述することで自動で記述された内容を実行およびインストールを自動化できます.また,実環境で様々なインストールを行うとごちゃごちゃしてしまうため,VM上で動かしたいときがあると思います.その時に,Vagrantを用いて簡単に環境構築を行うと良いかと思います.
私の環境
- Windows8.1
- VirtualBox5.0.10
- Vagrant1.8.1
Vagrantのインストール
まず初めにVagrantのインストールを行います.DLはVagrantの公式サイトから行ってください.
Download - Vagrant by HashiCorp
インストールが終わった後,以下のコマンドを実行して,図のようになったらインストールは完了です.
vagrant -v

VirtualBoxのインストール
次に,仮想的なコンピュータを構築をし,OSを起動して操作することが可能であるVMをインストールを行います.DLはこちらからできます.
Oracle VM VirtualBox - Downloads | Oracle Technology Network | Oracle
Vagrantにboxを追加
ここでは,Vagrantで動かすOSをVagrantbox.esからダウンロードし,boxに追加します.
A list of base boxes for Vagrant - Vagrantbox.es
今回は例としてCentOS7.0をダウンロードします.以下のコマンドを実行することでboxに追加できます.※なんかこのCentOSはドイツ語でした(笑)
vagrant box add CentOS7.0 https://github.com/tommy-muehle/puppet-vagrant-boxes/releases/download/1.1.0/centos-7.0-x86_64.box
追加することが終わった後は以下の図のようになり,

vagrant box list
とすることで,追加したboxの一覧を見ることが出来ます.

また,追加されたboxは,C:\Users\ユーザの名前\.vagrant.d\boxesに存在しています.
VMの作成
次に,VagrantのboxにあるOSをもとにVMを作成します.まず初めに仮想マシン用のフォルダを作成します.例として,C:\Users\ユーザの名前\VM\CentOS7.0 を作成し,CentOS7.0フォルダに移動します.
cd C:\Users\ユーザの名前
mkdir VM
cd VM
mkdir CentOS7.0
cd CentOS7.0
今CentOS7.0というフォルダにしていますが,他の名前でも大丈夫だと思います.
次に,以下のコマンドを実行することで,CentOS7.0の仮想マシンを作成します.今CentOS7.0としていますが,vagrant box listで表示されている該当のOSの名前を記述してください.
vagrant init CentOS7.0
環境構築~Vagrantfile~
VagrantはC:\Users\ユーザの名前\VM\CentOS7.0\Vagrantfileに書かれている内容をVM起動時に実行します.
Vagrantfileに実行するシェルスクリプトを指定します.また,WebブラウザでVM上のindex.htmlを見るために,config.vm.networkのコメントを外します.
Vagrantfile
# -*- mode: ruby -*-
# vi: set ft=ruby :

# All Vagrant configuration is done below. The "2" in Vagrant.configure
# configures the configuration version (we support older styles for
# backwards compatibility). Please don't change it unless you know what
# you're doing.
Vagrant.configure(2) do |config|
  # The most common configuration options are documented and commented below.
  # For a complete reference, please see the online documentation at
  # https://docs.vagrantup.com.

  # Every Vagrant development environment requires a box. You can search for
  # boxes at https://atlas.hashicorp.com/search.
  config.vm.box = "CentOS7.0"

  #シンボリックリンクしてもnpmコマンドを打てるような設定
  config.vm.provider "virtualbox" do |v|
    v.customize ["setextradata", :id, "VBoxInternal2/SharedFoldersEnableSymlinksCreate/v-root", "1"]
  end

  # シェルスクリプトの追加
  config.vm.provision :shell, :path => "provision.sh"

  # Disable automatic box update checking. If you disable this, then
  # boxes will only be checked for updates when the user runs
  # `vagrant box outdated`. This is not recommended.
  # config.vm.box_check_update = false

  # Create a forwarded port mapping which allows access to a specific port
  # within the machine from a port on the host machine. In the example below,
  # accessing "localhost:8080" will access port 80 on the guest machine.
  # config.vm.network "forwarded_port", guest: 80, host: 8080

  # Create a private network, which allows host-only access to the machine
  # using a specific IP.

  # 外からWebサイトが見れるようにコメントを外す
  config.vm.network "private_network", ip: "192.168.33.10"

  # Create a public network, which generally matched to bridged network.
  # Bridged networks make the machine appear as another physical device on
  # your network.
  # config.vm.network "public_network"

  # Share an additional folder to the guest VM. The first argument is
  # the path on the host to the actual folder. The second argument is
  # the path on the guest to mount the folder. And the optional third
  # argument is a set of non-required options.
  # config.vm.synced_folder "../data", "/vagrant_data"

  # Provider-specific configuration so you can fine-tune various
  # backing providers for Vagrant. These expose provider-specific options.
  # Example for VirtualBox:
  #
  # config.vm.provider "virtualbox" do |vb|
  #   # Display the VirtualBox GUI when booting the machine
  #   vb.gui = true
  #
  #   # Customize the amount of memory on the VM:
  #   vb.memory = "1024"
  # end
  #
  # View the documentation for the provider you are using for more
  # information on available options.

  # Define a Vagrant Push strategy for pushing to Atlas. Other push strategies
  # such as FTP and Heroku are also available. See the documentation at
  # https://docs.vagrantup.com/v2/push/atlas.html for more information.
  # config.push.define "atlas" do |push|
  #   push.app = "YOUR_ATLAS_USERNAME/YOUR_APPLICATION_NAME"
  # end

  # Enable provisioning with a shell script. Additional provisioners such as
  # Puppet, Chef, Ansible, Salt, and Docker are also available. Please see the
  # documentation for more information about their specific syntax and use.
  # config.vm.provision "shell", inline: <<-SHELL
  #   sudo apt-get update
  #   sudo apt-get install -y apache2
  # SHELL
end
環境構築~シェルスクリプト~
今回は,以下のソフトウェアを入れるシェルスクリプトを記述したいと思います.その他にも,/vagrantが仮想マシンとPCとの共有フォルダであるため,/var/www/htmlとシンボリックリンクを行い,/vagrantフォルダにWebアプリケーションを置けばすぐ動くようにします.
次にシェルスクリプトを書くファイル(C:\Users\ユーザの名前\VM\CentOS7.0\provision.sh)を作成します.
provision.sh
#VIMのインストール
sudo yum -y install vim

#httpdのインストール
sudo yum -y install httpd
#httpdのスタート(Apacheサーバ起動)
sudo systemctl start httpd
#Apacheサーバの自動起動
sudo systemctl enable httpd

#ファイヤーウォールの停止
sudo systemctl stop firewalld
#ファイヤーウォールをOS起動時に自動停止させる
sudo systemctl disable firewalld

#Webで表示するフォルダを削除
sudo rm -rf /var/www/html
#Webで表示するフォルダを.共有フォルダである/vagrantとシンボリックリンク
sudo ln -fs /vagrant /var/www/html

#index.htmlのファイルの作成
cd /vagrant
touch index.html
echo "<!DOCTYPE html><html><head><meta charset='utf-8'><title>test</title></head><body>Hello World</body></html>" > index.html

#Epelリポジトリの追加
sudo yum -y install epel-release
#Remiリポジトリの追加
wget http://rpms.famillecollet.com/enterprise/remi-release-7.rpm
sudo rpm -ivh ./remi-release-7.rpm

#phpのインストール
sudo yum -y --enablerepo=remi-php70,remi install php php-mcrypt php-mbstring php-fpm php-gd php-xml php-pdo php-mysqlnd php-devel

#Node.jsのインストール
sudo yum -y install nodejs npm
#npmの最新バージョンにする
npm install -g npm
#すべてのGlobalパッケージをアップデート
npm install -g jshint
#gulpのインストール
npm install -g gulp
#Node.jsのデーモン化ツールforeverのインストール
npm install -g forever

npm install -g n
#nodejsを最新バージョンにする
n stable

#MariaDBの削除(MySQLと競合を起こすため)
sudo yum -y remove mariadb-libs
#MySQLのインストール(http://dev.mysql.com/downloads/repo/yum/)
sudo yum -y install http://dev.mysql.com/get/mysql57-community-release-el6-7.noarch.rpm
sudo yum -y install mysql-community-server

#Composerのインストール
curl -sS https://getcomposer.org/installer | php
sudo mv composer.phar /usr/local/bin/composer

#unzipのインストール
sudo yum install -y unzip

#gitのインストール
sudo yum -y install git
これらを書き終えた後,C:\Users\ユーザの名前\VM\CentOS7.0上のコマンドライン(管理者)で以下のコマンドを実行します.これは,npmコマンドをシンボリックリンクしても実行できるようにする必要なコマンドです.
fsutil behavior set SymlinkEvaluation L2L:1 R2R:1 L2R:1 R2L:1
その後,
vagrant up

をすることでOSを立ち上げます.その際,provision.shの内容が実行されるため,シェルで書かれた以下のソフトウェアが自動的にインストールされます.
vagrant upは時間かかるので,ひとまず休憩しましょう.
終わると,Vagrantfileで書いてあるIPアドレスの192.168.33.10に接続してみましょう!
url : http://192.168.33.10
恐らくこのようになっていると思います.

これで終了です.また,C:\Users\ユーザの名前\VM\CentOS7.0を見てもらうとindex.htmlがあり,そこのindex.htmlの内容が表示されています.これは,先ほど述べたように,/vagrantが仮想マシンとPCとの共有フォルダであるため,/var/www/htmlとシンボリックリンクを行ったためです.
ssh接続
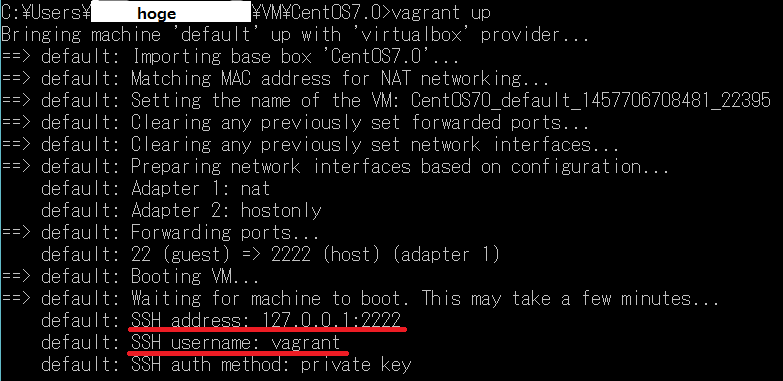
sshでCentOSに接続する際は,vagrant upで以下の図のような表示がされたと思います.

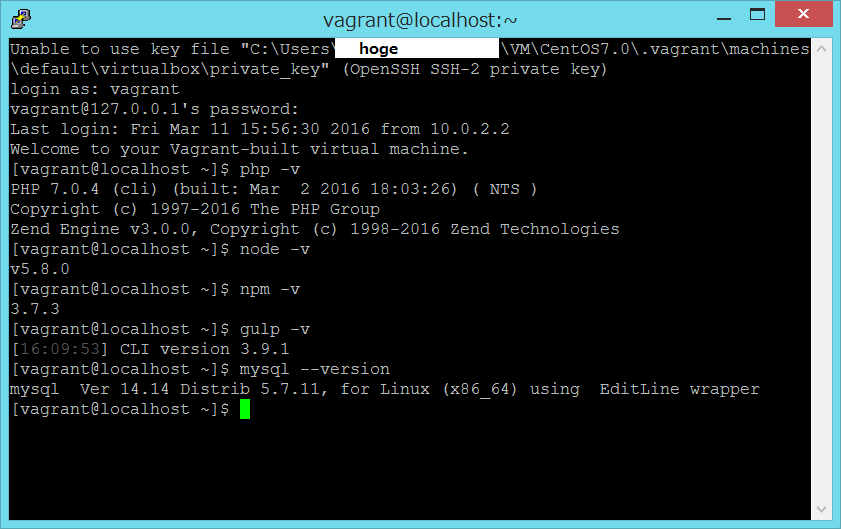
ここに記載されているsshのIPアドレスとポート番号をPuttyやTeraTermなどから接続します.また,公開鍵暗号を用いているので,その公開鍵のPathを設定します.場所はC:\Users\ユーザの名前\VM\CentOS7.0\.vagrant\machines\default\virtualbox\private_keyにあります.
接続すると,ユーザ名とパスワードを聞かれますので,
login as: vagrant
vagrant@127.0.0.1's password: vagrant
で接続できます.
ちゃんとインストールしたかったものが出来ているか確認できれば大丈夫です.

vagrantでCentOSのシャットダウン
シャットダウンをしたい場合は,C:\Users\ユーザの名前\VM\CentOS7.0上のコマンドラインで以下のコマンドを実行することでシャットダウン出来ます.
vagrant halt

参考文献
Vagrantの基本手順
qiita.com
Vagrantの共有フォルダの話
dotinstall.com
Vagrantのprovisionの話
dotinstall.com
Node.jsのインストール方法
moro-archive.hatenablog.com
PHP7のインストール方法
dqn.sakusakutto.jp
MySQLのインストール方法
qiita.com